Robot Rabbit

Robot Rabbit

translated from Russian via ChatGPT RU EN BunnyFleet
#203

A few takeaways about working with agents over these three days. A lot got done, but things broke at the same speed: lost maps, reset clocks, a camera frozen by gdb, a local build that went to prod. All these lessons are now written down in docs/ in the robot repo, so the next agent doesn't step on the same rakes. And the robot still needs proper Wi-Fi.

...
#202

Recorded a map of the flat manually with the gamepad. The robot drove really jerky: in the far room Wi-Fi is -75 dBm and commands arrive in bursts. A minute in the camera process crashed with CUDA out of memory in nvblox. Second attempt 8 minutes and 2.6 GB, in the middle the router kicked the robot and it "froze", but actually it just lost the network. The Cloudflare tunnel on QUIC never came back by itself after that, so I switched it to HTTP/2. And added smooth acceleration for the motors so bursts of commands don't jerk the robot.

Accelerating to half power now takes 0.3 seconds, and braking is three times faster so safety doesn't suffer:

def slew(current, target, dt, accel, decel):
    braking = abs(target) < abs(current) or target * current < 0
    step = (decel if braking else accel) * dt
    return current + max(-step, min(step, target - current))

The benchmark later showed the recording came out bad anyway: 4.5 frames per second instead of 15-30. Orin Nano has no hardware video encoder, LOSSLESS compresses on the CPU and can't keep up while tracking, nvblox and the detector run in parallel. Will re-record in a lightweight mode.

...
#201

Said "let's rewrite everything", the robot isn't in production. First a benchmark on recorded drives. First results: RTAB-Map found itself in 20 out of 20 starts without a single false fix, while GEN_3 didn't find itself at all in one of the directions. cuVSLAM computes odometry in 2.5 ms per frame. But there's no ground truth yet, so I need to stick marks of masking tape on the floor.

Preview
...
#200

First step: split the pose into odom and map. Navigation now drives on continuous odometry and map jumps don't jerk it. On a 2.8 m drive with a turn the difference is 3 mm.

...
#199

Asked a question: aren't we reinventing the wheel? The agent did a survey and answered: in navigation no, in localization yes. Nav2 from ROS for example can't do different turning radii left and right, so we keep our own Hybrid A*. But all the wrapping around GEN_3 (timeouts, the millimeter filter, map archives, resets) is patching a black box where one pose is both odometry and global positioning at the same time.

...
#198

Asked whether it's worth updating JetPack. It's not: the GPU is loaded at 20-25%, we're limited by memory and CPU. And in newer L4T the UART the RoboClaw hangs on is broken. Updating Python to 3.12 is more useful, especially since 3.10 support ends at the end of October.

...
#197

Yesterday there was an hour and a half of lowered clocks and I thought it was over-current throttling. Turns out I did it to myself: systemctl isolate multi-user.target while turning off GNOME restarted nvpmodel, and it brought back the default minimum clocks. Added a drop-in so jetson_clocks always runs after nvpmodel.

Real over-current (OC3) is there too, 1-2 times a second the clock drops by half for about a millisecond. In total around 0.5% of performance, NVIDIA says it's expected.

...
#196

Removed the operator heartbeat. It was meant as protection: if the UI disappears, the robot stops. In practice autonomous trips failed with "operator link lost" every time the tab wasn't open. Now the UI is just a viewer, and safety is handled by the robot itself: collision protection, stall detection and command timeouts.

...
#195

In the morning the robot couldn't find itself in the map. Turns out on shutdown the map file was saved in the LOST state and overwrote the good one. Even the backup didn't help, had to reset the map. Now the map is saved only when the camera knows for sure where it is.

...
#194

Turned the robot off for the night, but before that dumped all the day's data into Parquet, and the agent dug through it overnight without the robot. It found a great one: for a few seconds after relocalization the ZED SDK returns coordinates in millimeters, even though the settings say meters. 21 576 such poses in a day. That's where the 4 kilometer "jumps" in the logs came from, and a broken map with obstacles exactly where the robot had just driven. Also the KNOWN_MAP status flips back to INITIALIZING 5-8 seconds later, so "found itself" now only counts after 10 seconds of stable status.

The filter turned out simple: if the pose jumps further than the robot could have driven, it goes into quarantine for 4 seconds. If it comes back, it was a glitch. If it stays at the new place, it's a real correction.

def update(self, now, position):
    if self.accepted is None or self.reachable(self.accepted, now, position):
        self.accepted = (now, position)
        self.pending = None
        return True
    if self.pending is not None and self.reachable(self.pending[1:], now, position):
        if now - self.pending[0] >= self.settle_s:
            self.accepted = (now, position)
            return True
        return False
    self.pending = (now, now, position)
    return False
Preview
...
#193

Wi-Fi. The router hears the robot at -78 dBm, worse than any other device in the house. The Realtek driver ignores the country code and transmits at ~10 dBm. I disabled the limit table and power went up to 25 dBm. I know that's more than allowed in Australia.

...
#192

"Drive up to the fridge" didn't work before because the chat agent had no planner and sent the robot blind. Now a separate node builds a Hybrid A* route on a traversability grid that nvblox computes on the GPU in 1-5 ms (before, on the CPU, up to 3 seconds). A route is planned in 5-30 ms and replanned if something shows up on the way.

The fridge was fun: first the robot stopped in front of a wall corner, then 2.26 m from the fridge, and in the successful trip it changed its mind 6 times between the short route and a detour through the whole flat. In the end 5.35 m in 52 seconds and a stop 30-40 cm from the door.

Preview
...
#191

Found a bug in ZED SDK 5.5: GEN_3 tracking keeps adding keyframes even when the robot just stands still. 265 of them in 9 minutes, CPU from 31% to 135%, the map file swelled to 70-80 MB. Workaround: by default the camera only localizes in the existing map and extends it only for a new map or during exploration. At rest the camera process is now 17-45% CPU instead of 134-185%.

...
#190

The map is now made of 5 cm voxels, just like the minecraft world I wrote about in #161. At first the robot was driving over bricks sticking out of the floor: the floor sat exactly on a voxel boundary and ±1 cm of noise pushed it into the row above. Shifted the grid by half a voxel and bricks went from 14% to 2%.

...
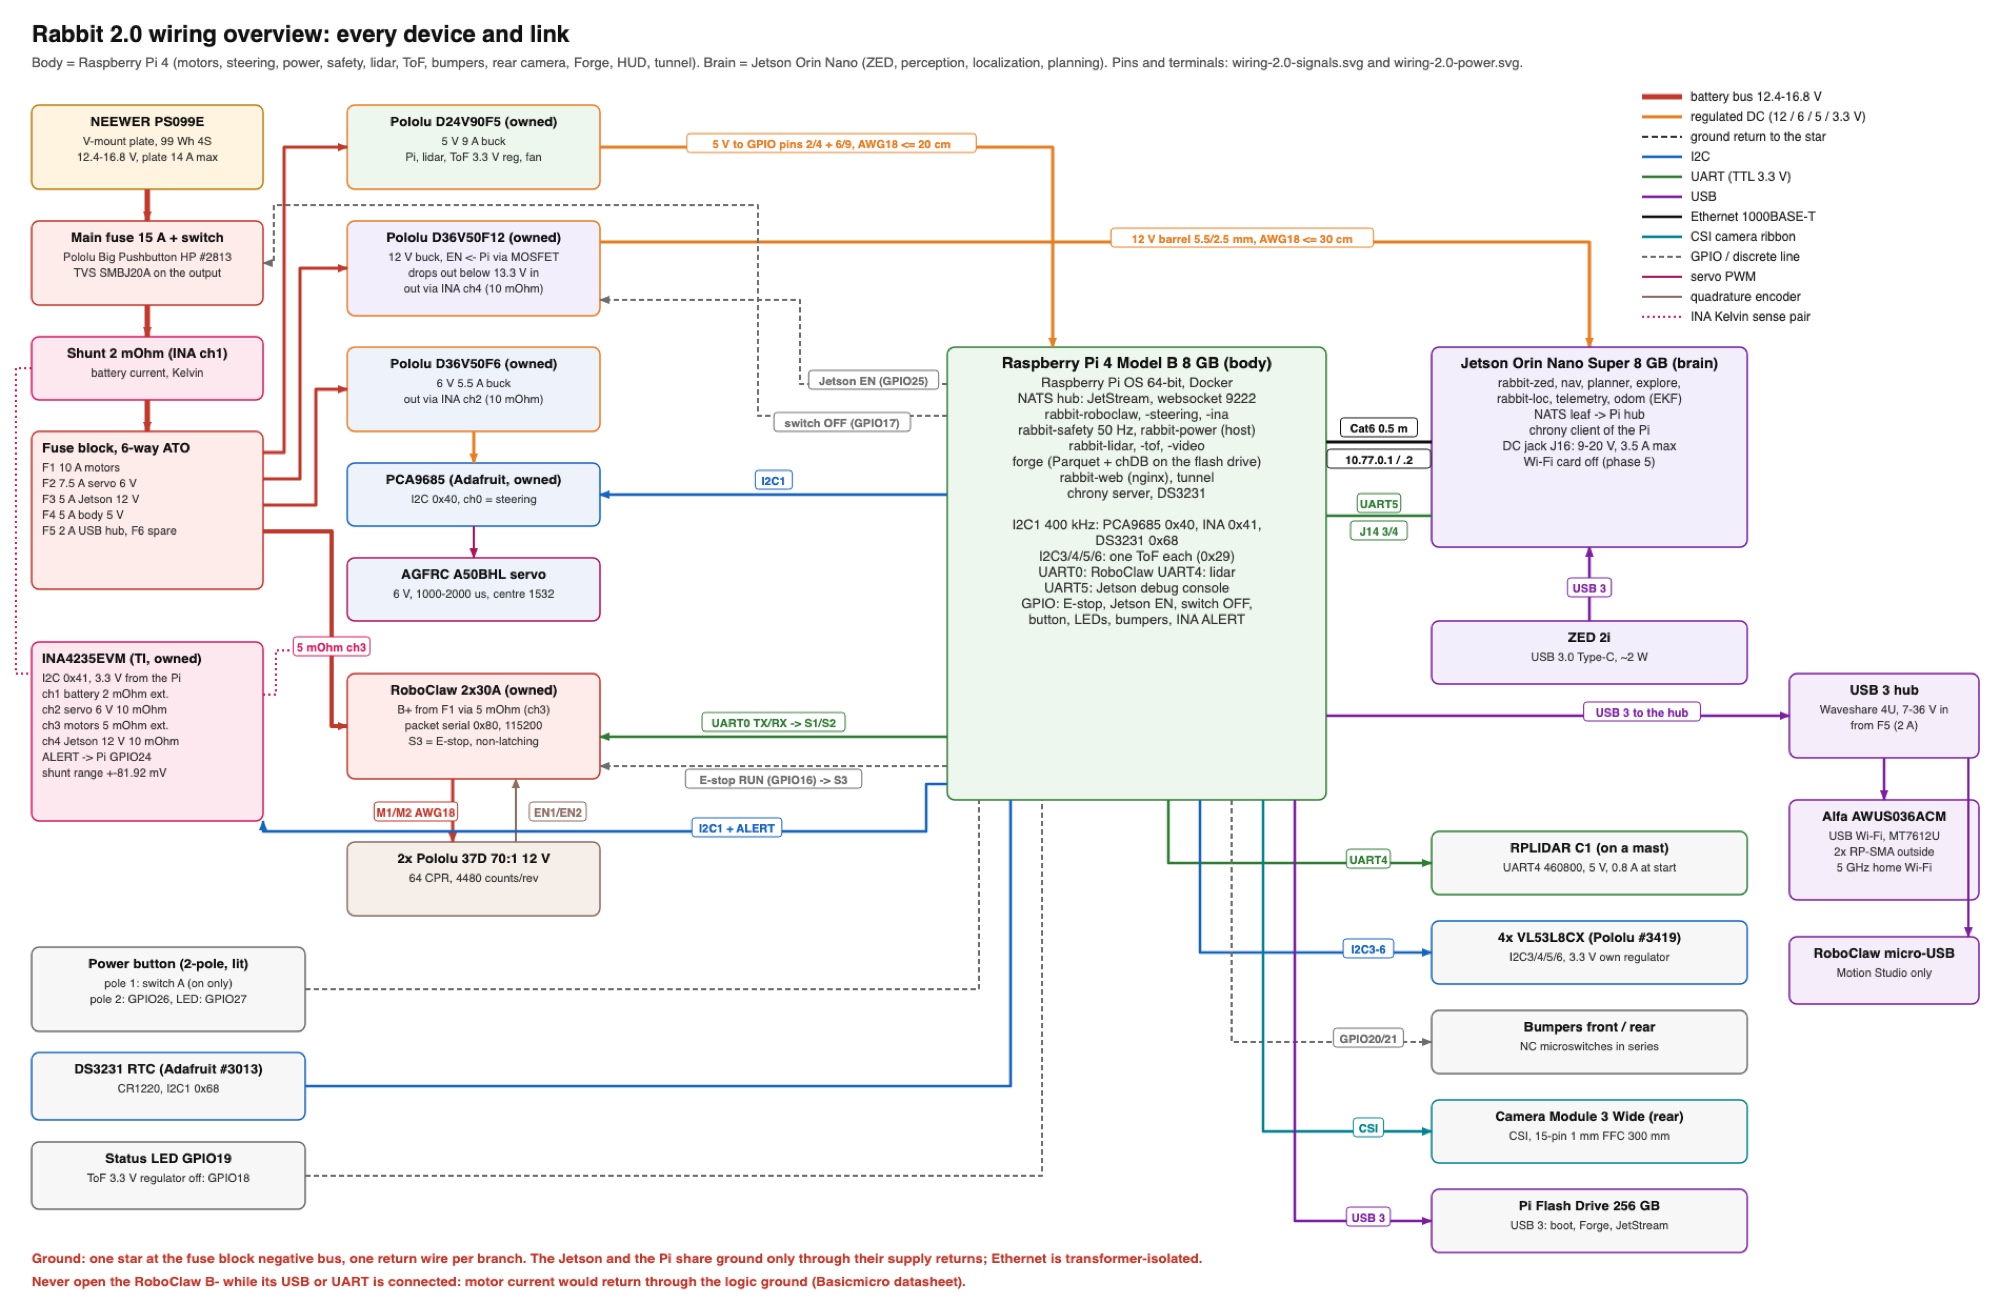
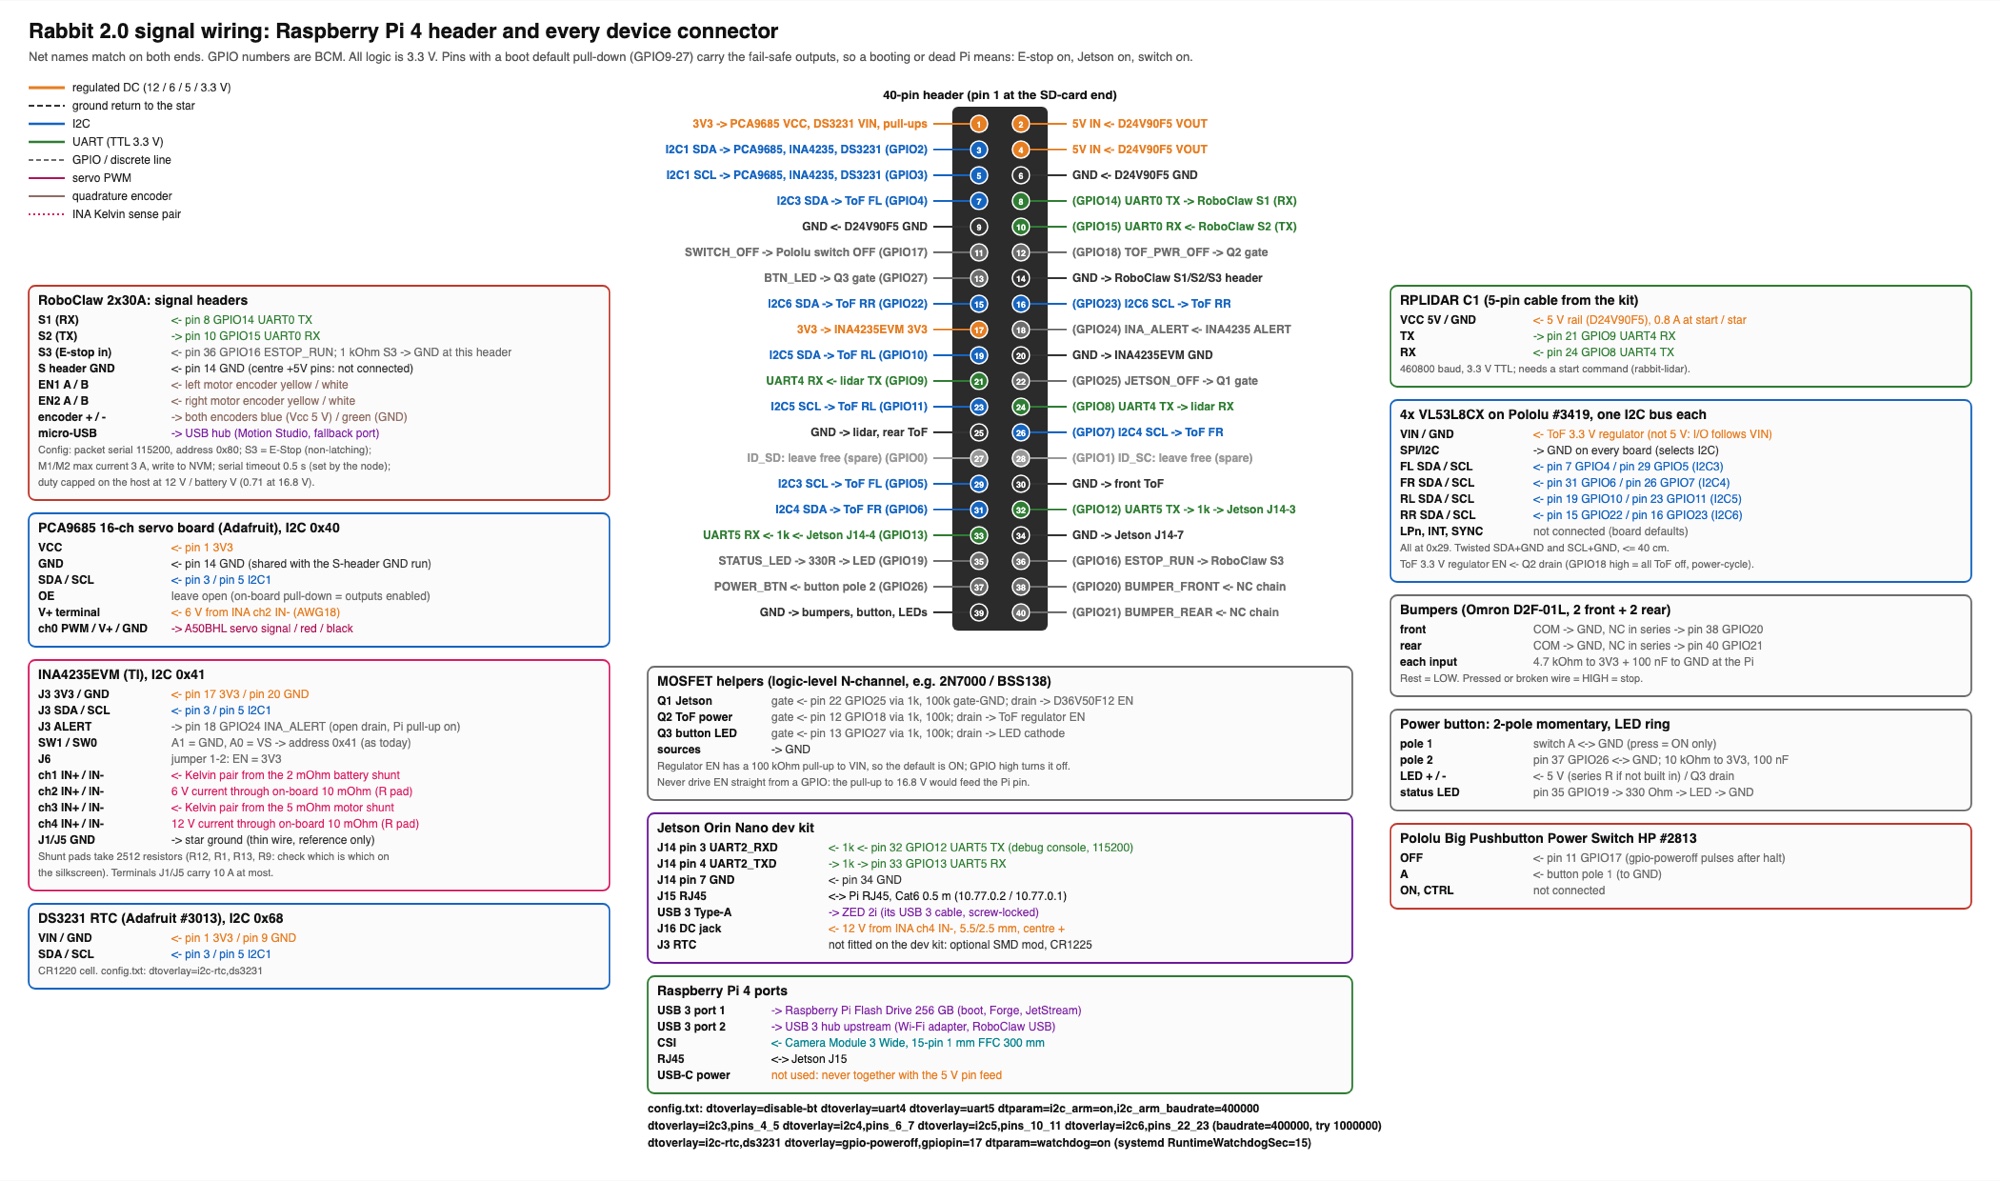
#189

Put the robot on a table and watched it fall through the floor in the UI. The floor estimate assumed the wheels are always on the floor and moved up 69 cm together with the camera. Plus the glossy parquet and glass gave reflections, there was a whole mirror room under the floor. Now a new floor level is accepted only after driving a meter on it, and depth rays are clipped at the floor plane right in CUDA.

...
#188

During the day three agents worked in one repo and on one robot at the same time: one moved the map to nvblox, the second did the detector, the third did voice. They coordinated with messages like "taking the camera", "releasing the camera" and "don't deploy, my image is still building". One of them still ran a local vite build, someone else's deploy shipped it to the robot and the public UI broke with CORS. Just like a real team.

...
#187

Added voice. OpenAI Realtime right in the UI, all the same tools as the chat, charts show up in the same feed. At first it only answered in English because the shared prompt said "always write in English".

You can confirm a mission by voice, but the decision is made by code from the transcript of what I said, not by the model: only short phrases, and any negation wins, so "yes no, cancel" is a no.

...
#186

Added object detection. We went through a bunch of options from cloud models to plain YOLO on COCO, but the camera sits 13 cm above the floor and models have barely seen this angle: the TV stand was called a bench and the TV a blackboard. In the end it's YOLOE with an open vocabulary, 58 classes baked into the ONNX, and the ZED SDK builds TensorRT itself, computes 3D boxes and tracks objects. Had to add a separate "low wooden cabinet" class, otherwise it couldn't find the TV stand. The first TensorRT engine build took 9 minutes.

Preview
...
#185

nvblox is back, but done right this time. We recorded an SVO and ran the same drive through different configs: the ZED map is +2.1 GB of memory, while nvblox builds a fuller map in 184 MB and ~2 ms per frame on the GPU. The agent built nvblox on the Jetson (16 minutes) and wrote a small C++/CUDA extension with nanobind that takes depth from the camera and outputs mesh blocks in the same format as before. The camera process went from 3.4 GB down to 1.4 GB. Threw it out yesterday, brought it back today.

...
#184

Started optimizing the camera aggressively. The ZED process was eating 185% CPU and it turned out Python had nothing to do with it: 90% of the time is inside the SDK, in the GEN_3 tracking optimizer. So rewriting everything in C++ doesn't make much sense.

Along the way the agent attached gdb to the live camera process and froze it for 2 minutes. Now that's a rule: no gdb on the camera, only py-spy.

...
#183

All the interrupts on the Jetson were on CPU0 and it was loaded at 100%. Spread the camera, UART and I2C across different cores. Removed the GNOME desktop which I don't need, that's +300 MB of memory. As it turned out later, exactly this switch reset the clocks for an hour and a half (#197).

...
#182

The robot is now reachable from the internet through a Cloudflare tunnel: live.rabbit0.dev. Then I realized anyone with this link can drive the robot around and reset the map, so I made personal links. I give a link to a friend, they play around, then I delete it and 5 seconds later everything drops for them.

...
#181

Merged Forge into the robot monorepo and moved it together with the UI onto the Jetson itself: ClickHouse with a 900 MB limit, recording no longer depends on whether my mac is on. ClickHouse was eating 75% of a core, turned out it was an insert every second into every table. Made it every 10 seconds and the load dropped by half.

...
#180

The CONTACT indicator kept jumping to the floor. We counted in the data: 84-91% of "nearest obstacles" were the floor. Height was measured from a global floor estimate, and 1° of pose tilt is already 5 cm at three meters. Now the floor plane is fitted in every frame.

...
#179

Then the map disappeared from the UI again. Tracking ran away to -138 meters, and I was sending mesh vertices as int16 in millimeters, so ±32 meters max, and everything overflowed. Now every chunk has its own origin. Never figured out why tracking ran away.

...
#178

Bad news in the morning: the big map of the flat is gone for good. If the camera couldn't find itself in 15 seconds, the map was renamed to the only backup, and a second failure in a row overwrote that too. It happened twice overnight and once more in the morning from the platform. Now there's an archive of the last 5 maps.

...
#177

Went to sleep and left agents working overnight: code review, UI performance, Forge in docker compose. In the morning there were 12 commits. The reviewer btw found that after any rejected mission all the safety trips (collision, stall) were silently turned off. Good that the reviewer found it and not a wall.

...
#176

Complained about lag, the video was sometimes 6 seconds behind. Found three causes:

  • the ZED mesh filter held the GIL for up to 2 seconds and froze the whole camera process, and after filtering the whole map was sent again every time
  • the telemetry node blocked its event loop with a jtop call, RTT to NATS was 2.4 seconds
  • the router kicked the robot 45 times an hour, the Realtek driver turned power save back on after every reconnect

Inside the robot latency is now tens of milliseconds, the rest is Wi-Fi.

...
#175

Redid the differential from #163 with proper Ackermann geometry, and the minimum turning radius grew from 0.31 to 0.37-0.47 m. Had to bring back a 1.6 gain, now the rear wheels help steer a bit. And it turns out it turns wider to the right than to the left: 0.40 vs 0.30 m. Now there are separate tables for left and right turns everywhere.

...
#174

Asked for a command so the robot builds a map of the flat by itself. All the ready-made packages for this are tied to ROS, so our own again: frontier exploration and Hybrid A* for Ackermann with forward and reverse.

At first the robot didn't go anywhere at all. I had tuned the depth thresholds for a pretty map, and in front of a white wall in dim light the camera started throwing away 80-90% of points. The robot thought it was blind. I reverted the thresholds and it drove 6 meters in 46 seconds. The map got noisier, but a clean map and dense obstacles are fed by the same depth and you have to pick.

...
#173

The robot crashed into a wall. Twice. The safety guard was supposed to stop it at 15 cm, but the camera can't see depth closer than ~30 cm (I wrote about the blind zone back in #154). The wall just disappeared from the scan right before contact and the robot decided the path was clear. Now it stops at 30 cm and obstacles are remembered in world coordinates for a few seconds.

...
#172

At some point the Jetson rebooted by itself right in the middle of maneuvers. After that the RoboClaw moved from /dev/ttyACM0 to /dev/ttyACM1 and the node crashed, and the camera got stuck looking for itself in the saved map. The best part came next: the motors pulled 6 A each and the robot "didn't move", I already thought something was jammed. But it was moving, the camera pose was just frozen. Ping to the robot was 1.5 seconds at the time because of Wi-Fi power save.

...
#171

First autonomous drives. The mission queue lives on the robot: "turn around and drive one meter forward" works, it turns 180° within a degree. You click in the 3D scene and the robot drives there, and if the point is behind, it turns around back and forth in a few moves. I also calibrated the steering zero: without trim the robot drifted 3.75° over half a meter, with +32 µs trim it's almost straight.

...
#170

The UI is completely rewritten: now it's one 3D scene with the robot in Crysis style, telemetry panels, a third-person camera and an AI chat right in the interface. In the chat you can ask about the data and get a chart, or ask the robot to drive, but any motion needs an APPROVE click. The bunny model with ears was also drawn by the agent.

...
#169

Updated the ZED SDK to 5.5 and decided to build the room map with the built-in spatial mapping. I threw out the old nvblox I built last August (#160) completely, together with the self-built torch. Spoiler: that was a mistake.

The first problem showed up right away: the camera process ate 5.4 GB out of 7.4. We measured feature by feature and spatial mapping alone took about 2 GB. Had to cap its memory and set the resolution to 5 cm.

...
#168

In parallel I started Forge. The idea is simple: write absolutely everything the robot publishes into ClickHouse on one clock and add an agent that answers questions about this data. For common questions there are pre-checked queries (I called them slabs), for everything else the agent writes SQL itself, but it goes through a static check and EXPLAIN before it runs. Plus anomaly detection with Chronos-2, a foundation model for time series: it predicts what a signal should look like and an anomaly is when the signal leaves the forecast band. Basically the kind of analytics I build at work, just a tiny version.

...
#167

RoboClaw over USB vs UART: 377 reads per second with no errors vs 119 with occasional CRC errors. Also after a Jetson reboot NTP moves the clock, but the camera has its own clock, so all poses ended up 5.7 minutes in the past. Now camera time goes through an offset to the system clock.

...
#166

The funniest part: the ZED couldn't hold 30 fps because the CPU was sitting at 730 MHz out of 1728 and the GPU at 306 out of 1020. Nobody had run jetson_clocks. One command and frame capture went from 34 ms to 14 ms.

...
#165

First we sorted out the telemetry. Before, roboclaw published speed 10 times a second and the current sensor once a second, which is useless because a battery sag on launch lasts a few hundred milliseconds. Now motors and power are 50 Hz, steering 20 Hz, IMU from the camera ~110 Hz (400 Hz inside, I average it), and every message has a timestamp in nanoseconds.

Along the way we found a bunch of old bugs:

  • RoboClaw read_status expected 1 byte but firmware 4.x returns 4 bytes + CRC, so the status always failed with CRC mismatch
  • set_interval in init() never returned
  • a bare except: swallowed CancelledError, nodes couldn't shut down properly and the map was never saved on stop
  • the camera wrote the current white balance into KV as the default and the picture stayed yellow forever
...
#164

I haven't written anything for over a year. The robot mostly just sat there: when I turned it on, docker said all the containers had exited 5 months ago. I decided to come back to it with a new approach: almost all the code is now written by Claude Code agents, and I set the tasks, watch what comes out, put the robot on the floor and carry it from place to place. Let's see how it goes.

...
#163

Got to the differential. Implemented and calibrated it. Now the turning radius is minimal and the wheels don’t slip when turning.

Click to Play
Preview
...
#162

Next, you can build graphs based on this map. Nodes are voxels with weights, knowing the cost you can use it for route planning, avoiding expensive sections, for example so the robot doesn't get too close to walls or crash into them. Then dijkstra or a* and the robot can search for a path from its position to the goal using pure pursuit.

Right now it's super rough and not accurate, needs calibration and bugfixing. But the fact that the e2e pipeline already works at all is awesome, even though it took so much pain and time and I've probably only moved like 5% towards the goal of implementing local navigation.

...
#161

The next step was hooking up the vision pipeline to the robot. At first, I thought about writing the depth map and frames into a shared file but NATS easily handles a low-res stream. So in the end the camera sends rgb + depth to a topic and the nvblox node subscribes to them. For high resolution I’ll have to figure something else out but for now, it works. The camera intrinsics and pose get updated in the kv store instead of just sending them as messages to topics, which turned out to be much more convenient (even though under the hood it’s basically the same thing)

nvblox takes the depth and position and builds the tsdf (distance field to the surface) on the GPU in real time. It smoothes out noise, merges a lot of frames and gives you a map with free and occupied areas. From this you can get a voxel map just like a Minecraft world.

Click to Play
Preview
...
#160

Built nvblox on jetson. There's no ready torch package so I had to build it myself. It crashed three times for different reasons, in the end enabling swap helped since jetson doesn't have enough memory to build the package. Building C++ with cuda and python is also painful, even with a docker container where you can build everything, it's not hermetic, it falls apart.

Then I struggled with a minimal dockerfile. I managed to run the tests, but the docker image is huge with a ton of dev dependencies I don't understand so I wanted to get the bare minimum runtime. In the end, after a few days of cleanup, I built a compact image with binaries and python bindings.

...
...
#158

More and more I’m using NATS in the project. Threw together a simple UI to control camera settings from the UI. For this I decided to step away a bit from the idea of using pub sub for everything and take a look at jetstream. By default NATS core doesn’t have persistence but you can turn it on by enabling jetstream. Basically it’s just one flag and now you get a persistent KV store, object store and some delivery guarantees. All of this is super useful and really easy to use. For example camera settings are just a KV. Both the client and the robot subscribe to this key (in jetstream everything’s still just subjects) and can react to changes, both of them can also change the value and all clients instantly react to it and after restart the state is restored.

Click to Play
Preview
...
...
#156

I haven't written anything for a while but that doesn't mean I wasn't doing stuff. While I was in Byron Bay I didn’t have the robot around so I worked on a content generator for the blog.

  • All posts from Telegram go into a markdown file, with metadata for each post.
  • Every post gets translated through the ChatGPT API
  • All images get compressed to webp
  • A preview is generated for every video using ffmpeg and it also gets compressed to webp
  • Wanted to do it all without any javascript at all
  • Deployed on cloudflare.
  • Source code is here rabbit0.dev
...
#155

I'm really annoyed that NVIDIA removed the hardware h264 encoder from the Jetson even though they market it as an edge AI device with two CSI ports for cameras. With a software codec, CPU load at 1080p@30fps reaches up to 40% and power consumption shoots up a lot.

After looking into the topic a bit, it feels like the Raspberry Pi 5 also lost the hardware encoder because of a chip shortage, but the rpi4 still has it. By the way, I have one and used it in the robot until I rebuilt it with a Jetson. At the same resolution and frame rate, the rpi4 pulls a bit over 5W and CPU load isn’t more than 5% handling the stream without any hiccups.

Now I’m starting to think maybe moving all the mechanics control and camera streaming from the Jetson to the rpi and merging them into a cluster isn’t such a bad idea. It seems like the extra 5W won’t matter but will free up all resources for Huang.

Now there's the question of how to connect them together since a NATS server needs to run somewhere. Ethernet + a mini switch or ethernet over usb?

...
#154

Because the baseline of the stereo pair is pretty wide it can only measure depth from 30 cm. This creates a blind spot in front of the robot. Tolerable but not very nice. Maybe it's worth thinking about a lidar or a proximity sensor for obstacle avoidance.

...
#153

I couldn’t resist and decided to play around with points cloud and depth measurement. For now I tried the lightest model.

What you see at the bottom of the screen isn’t SLAM yet, it’s just a stateless point cloud that gets published from the robot to nats at 30hz and drawn using treejs in the browser. The further a point is, the greener it gets. That’s just for convenience but in code it’s just a 3 or 4 dimensional matrix (4 if you want to keep the original camera color)

Turns out the tricky part is that 1280x720 is way too heavy and just the raw byte blob of this matrix is 70+Mb. Pumping such an array 30 times a second is impossible because of the 64Mb per message limit and bandwidth restrictions. After dropping the resolution to 320p and compressing it with zlib, I managed to get a couple hundred kilobytes which seems ok. Plus this matrix is sparse so you could also cut out the zeros. Maybe it doesn’t even make sense if you compress anyway.

Click to Play
Preview
...
#152

Now I have to squash everything back into a single node that exclusively has access to the camera and does everything.

...
#151

Because of this, the idea brings a few other problems. At first, I thought about making several nodes that work with the camera. Since only one process can access the camera, I thought about local streaming through the ZED SDK. So, one process connects to the camera and streams a compressed h264 stream. The SDK also allows you to read other parameters through streaming as if you’re using the camera locally. But the problem is the streaming in the SDK really depends on hardware encoding and without it everything crashes and doesn’t work.

...
#150

Another disappointment: the NVIDIA Jetson Orin nano doesn't have hardware h264 encoding.

...
#149

Today I caught myself thinking that there are so many cool ideas I want to try out but already a ton of technical debt I probably should deal with first.

At the very least, I really want to finish the mechanics right now so I can move on to perception.

  • redo the steering
  • reinforce the second floor (laser cut an acrylic plate and rebuild on a new platform)
  • change the rear motors or raise the axles a bit and buy bigger wheels
  • tweak the acceleration or distribute the weight better (right now the rabbit jumps a bit when accelerating hard)
...
#148

Big milestone. It can move and be controlled remotely.

  • runs on battery
  • video streams in real time at 720p@30
  • controller lag is minimal

Problems:

  • steering is super twitchy
  • gear ratio is way too high and the robot is really slow and noisy (bldc?)
  • video isn’t compressed with h264, I just take every frame and compress it as jpeg so tons of gigabytes are flying around, which won’t work over 4g
  • steering angles are very small, need to redo the hub and links
Click to Play
Preview
...
#147

Today I wired up all the cables and components. Had to take it apart and put it back together five times because every time some new crap came up.

On the bright side, the battery is awesome. First, it can pass current when it’s plugged into the charger and it can charge and power the robot at the same time.

Preview
...
#146

Wired up the rear motor controller, voltage sensor, 2 step down regulators - one for the servo steering, the other for the motors and controller - and started it up from the battery. Looks like nothing smoked, that's a good sign.

Preview
...
#145

Perfectionism is the main enemy of productivity

Preview
...
#144

Kind of reminds me of the robot from the movie ā€œWALL-Eā€. Overall I'm happy with how it looks and how everything fit in. Now I need to connect the wires and check that everything works.

Preview
...
#143

The battery, of course, makes it look a bit hunchbacked and the stereo camera adds some facial expression. With the arm it'll look even funnier. The front is a bit empty for now but that's where the arm controller will go. In the future there will also be a lidar but that's for later. The problem is that the camera has a minimum depth measurement of 30 cm, so right in front of the robot it has a blind spot. I'll have to find a way to deal with that too.

Preview Preview Preview Preview Preview Preview
...
#142

Put everything together but haven’t connected the wires yet. Wanted to see how it looks assembled. No arm for now, I’ll add it a bit later or maybe leave it for the next milestone.

Preview
...
#141

Next is the four-channel INA. I'll write about it a bit later. Today I soldered 4 shunts of 0.01 Ohm to measure current and voltage at different points.

Preview Preview Preview
...
#140

It's a bit trickier with the Jetson because it doesn't have holes on the dev board. I had to drill some holes myself, I hope I didn't touch anything important and it's still working.

Preview Preview Preview
...
#139

I got a plate like this with standoffs where I'll mount the components.

Preview Preview Preview
...
#138

After that I cut threads so I wouldn't have to screw on nuts from the other side.

Preview Preview
...
#137

I couldn't handle CAD so I decided to draw everything in Figma. Almost all components had datasheets with dimensions but some I had to measure by hand to place the holes accurately. Then I went to Denis and printed out the layout for the components and holes. I glued it to the sheets I cut with the laser and drilled the holes.

Preview Preview Preview
...
#136

Today I didn't leave the house at all and spent the whole day working on the robot. After 2 weeks with no progress I got excited about it again and made pretty good headway. I found the best layout for the components to minimize wires and fit everything in nice and compact.

Preview
...
#135

The whole robot assembled will be about 3.5kg. That's pretty hefty honestly.

Preview
...
...
#133

There’s still a chance the battery specs are lying and in reality it gives out a lot less. Really don’t want that because going back to RC lipo with high current output means messing with charging, BMS and all sorts of other protections and safety stuff.

...
#132

Tried a few more heavy workloads. Jetson keeps reporting ā€œSystem throttled due to over-current.ā€ I doubt it’s actually complaining about too much current from turning on the GPU. Most likely it’s just a standard protection error and the real problem is under voltage. The battery should easily give out 10A according to the specs and even more at peak, which should be more than enough for Jetson. The reason might be wires that are too thin and too long. I bought a barrel jack without checking the cable thickness. What arrived was AWG22, one meter long. Voltage drop on this setup can reach up to 1V during current spikes, which will definitely be noticed and probably makes Jetson do throttling even though the voltage is technically enough.

On the weekend I’ll try to measure current and voltage under different loads. In the best case I’ll just cut the wires. If that doesn’t help and the wires really are the problem, I’ll have to order a new barrel jack with AWG18 for the fourth time.

...
#131

The SDK has models for building point clouds that will be useful for SLAM (simultaneous localization and mapping) when the robot figures out its position and maintains a map of the area.

Click to Play
Preview
...
#130

There’s also an IMU in the camera. Accelerometer gyroscope and magnetometer.

Click to Play
Preview
...
...
#128

When installing the ZED SDK it decided it needed to optimize the neural depth models, which pushed the consumption up to 7W and 1.4A

Preview
...
#127

With minimal load in MAXN_SUPER power mode the consumption is no more than 1A. I'll try to load it with a camera and see how long it runs on battery alone.

Preview
...
#126

On the third try I ordered the right barrel jack for power and dupont connectors. Crimped everything quickly and checked if it works. According to the dev board specs, it can be powered by 9-20V. The battery at 96% gives 16.2V which is within the limits so I can power it without step down converters.

...
#125

It’s so annoying how badly nvidia tests jetpack. Yesterday I finally broke my jetson and decided to reflash it from scratch. After an hour the fresh jetpack couldn’t launch chrome or any other browser. After a couple hours chatting with chat gpt and claude, all I got was installing chrome from flatpak.

This morning I decided to try gemini + deep research and it was straight šŸ”„. The problem is in snap and the simplest way to fix it is to roll snap back one version. This is already the second time when a really basic use case breaks in jetpack and gets fixed by just rolling back versions.

Preview
...
#124

From other updates I finally got the 5G gateway. Already took it apart – it's more compact and it's easier to mount the board on standoffs on the robot's body. I thought GNSS and 5G antennas would be included but they weren't, so I'll have to order them separately.

Preview
...
#123

Picked up a package from the US today with the ZED 2i stereo camera. It looks awesome, really. My version has a 2.1mm focal length. I figured that’d work a bit better indoors than 4mm. Some interesting features:

  • The SDK doesn’t work in Parallels because it’s only built for x86 and doesn’t work on Windows ARM
  • You have to download the SDK from the website, it’s not in the Python repos which is kind of annoying. Even to just run a simple image capture you’ll have to mess around a bit but on the bright side there’s already a prebuilt docker image for l4t and jetpack
  • It refused to work with any USB cables except the original one. That’s just plain annoying because you end up debugging the software and only later realize it’s actually the stupid USB cable
  • I wouldn’t say I’m super impressed with the image quality but it’s got loads of other benefits. It’s got IMU and fusion and a bunch of other sensors built in and it’s pretty easy to use them
  • In the end after about 4 hours I got it running and streamed video and sensor telemetry through nats to the browser
Preview
...
#122

Decided to update the interface a bit and refactor the code. I want to make the UI in a retro style with some pixel art. Threw together some basic components, picked the fonts, added a built-in debug terminal (planning to use it to send custom messages to nats) and added a cute loader.

Click to Play
Preview
Preview
...
#121

Plus for sensors and telemetry nats -> telegraf -> influxdb -> grafana is just insanely simple

...
#120

After a couple of days spent with nats, I'm thrilled with it. It's so simple, lightweight and convenient that I don't get how I hadn't come across it before. Feels like it's the nginx of the pubsub world.

...
#119

Took a deep breath and switched completely to nats. This gave me:

  • ditched webrtc (that was a huge chunk)

  • no more signaling server for webrtc

  • ros2 is gone (lots of code)

  • weird build scripts for running ros2 in docker and locally are gone

  • now the client uses websocket and nats

  • access to all topics on the client

  • no custom message building

  • video is sent as frames in separate messages

  • everything works great in docker and gets monitored with standard tools like prometheus and influxdb

  • robot nodes can be in any language including typescript

  • codebase is much smaller now, no weird autogenerated files, everything is clean and tidy

  • dropping ros2 was the best decision

  • almost all libraries for image processing, slam and navigation are available as libraries and not tied to ros2 so it won't block using them

  • downside — had to drop foxglove, but I think I'll try to write a bridge for it

...
#118

Maybe someday I'll put my thoughts together and try to describe all my grievances about it in the most neutral way but for now I'm too lazy.

Yesterday I completely deleted from the repository all the code that me and the LLM wrote in a week (a few thousand lines).

...
#117

After about a week of digging into ROS2 as a framework and ecosystem I gave up and put it aside for now. I’m honestly surprised how this became an industry standard. I tried to separate my feelings of rejecting something new from the real struggles beginners have when learning ROS2.

It’s so clunky and boilerplate-heavy it makes you feel sick. Sure, the ecosystem, contracts, approaches blah blah blah. But I don’t see a single reason to use it except for learning or adding a line to your resume.

...
#116

The fun begins with jetson orin nano. Fresh docker doesn’t work and crashes with an error:

failed to solve: process "/bin/sh -c uv sync" did not complete successfully: failed to create endpoint laixim2p0a4udq2v8p15ez4p2 on network bridge: Unable to enable DIRECT ACCESS FILTERING - DROP rule:  (iptables failed: iptables --wait -t raw -A PREROUTING -d 172.17.0.2 ! -i docker0 -j DROP: iptables v1.8.7 (legacy): can't initialize iptables table `raw': Table does not exist (do you need to insmod?)
Perhaps iptables or your kernel needs to be upgraded.

https://forums.developer.nvidia.com/t/iptables-error-message/333007

People suggest

downgrade the docker to avoid the error

...
...
#114

That's all for today. It still doesn't drive but it looks like the next milestone is already in sight.

Preview Preview Preview
...
#113

At the same time, the steering servo is connected through PCA9685 and directly to the jetson pins. But I don't really want to solder a bunch of wires so I bought an i2c expansion board. It's convenient, I'll add more i2c too. Plus, the ground pin header turned out to be super handy for tying all the GNDs together on all the boards.

Preview
...
#112

I want 4 of these sensors. One between the robot and the battery and 3 others after the step down DC converters:

  • rear motors
  • nvidia jetson
  • all servo drives (arm and steering) but maybe I'll split them later

4 sensors and they all have the same i2c address by default. You can change this by soldering jumpers on the breakout board. But I'm not a big fan of that. So I bought an i2c multiplexer. At first I thought this multiplexer worked like a router and supported virtual addresses. Like for example the multiplexer itself has address 0x40 and supports an internal virtual address space and lets you connect chips with the same names and access them by pin group indexes, so you can write and read from all devices at the same time. But it doesn't work like that. Basically it's just an 8-channel switch you can toggle in software. But that's not really a problem because reading from all the sensors can be done very simply with a loop that goes through all the enabled channels, reads data from the same address and writes it to a ros2 topic and then to influxdb. All that is around 20 lines in Python and can run in a separate docker container.

...
#111

Figured out how the ina226 works – it’s a current sensor you can read over i2c. It’s all pretty simple but by default the Chinese breakout board comes with an R100 shunt which is way too much for measuring currents over 819.175 mA. Even though the board can handle the power and nothing will break, the data just gets clipped. But it’s super easy to fix – just swap the shunt resistor to R010 (mĪ©). After that, yeah, you lose some accuracy but you can measure up to 8.2A. That’s definitely overkill, but honestly 0.8A is way too low too. Ordered R010 2512 (in SMD form factor) from AliExpress because as usual Jaycar has nothing.

Preview Preview
...
...
#109

Ordered new ones from Amazon in the right size. A few days later they showed up in the same sizešŸ¤¦ā€ā™‚ļø how does that even happen?

...
#108

I need to write setup.sh to bootstrap the robot from scratch. I can't handle setting up ssh, wg and all the packages for the fourth time.

...
#107

I put all the boards on the acrylic and mounted some of them on standoffs. Looks like everything fits but I still need to think more about the layout.

Preview Preview Preview
...
#106

Also today I picked up the laser-cut acrylic. It turned out perfect and really neat. For this version I'll drill the holes by hand, and for the next version I'll draw all the holes in CAD so everything comes out perfect.

Preview Preview Preview Preview
...
#105

Tried to make the rpi camera work with jetson but it didn't work out. Oh well, I'll wait for the zed and then do it properly.

Preview Preview Preview
...
#104

The lithium grease arrived. I greased all the moving parts.

Preview Preview
...
...
#102

Not really happy with how cutting acrylic sheets with a fretsaw turns out. Decided to try ordering laser cutting.

Preview
...
#101

Changed the plastic steering hubs to aluminum ones and matched the color to the robotic arm.

Preview Preview Preview
...
#100

That's all for today, that's how it looks so far, but there will be another intermediate level where the Nvidia Jetson and a couple other boards will be.

Preview
...
#99

Next I want to place all the boards on acrylic plates. I cut out the shape I needed with a jigsaw, drilled some holes and tapped threads to screw in the standoffs.

Preview Preview Preview Preview Preview
...
#98

Here’s what it looks like at first glance. I’ll trim the base a bit later so the corners don’t stick out so much.

Click to Play
Preview
...
#97

I got really lucky that the holes on the metal plate almost perfectly matched the v plate. Just to be sure I drilled a couple of M4 holes.

Preview Preview
...
#96

Took the robot completely apart and started assembling the arm

Preview Preview Preview Preview Preview Preview
...
#95

Looks like it's time to take apart the first prototype and start building a new one v0.0.2

Preview
...
#94

And last - metal cutting discs and taps for threading. I'll try to place all the electronics compactly and securely.

Preview
...
#93

And finally, the ball rod ends for the steering link have arrived. The link itself and the hubs haven't arrived yet. I don't remember if I wrote about it or not but I want to replace all the plastic parts with these metal upgrades.

Preview
...
#92

Since i2c supports addressing you can just parallel the pins by changing the device addresses. There's this small and handy 10-channel device for that.

Preview
...
#91

From the more interesting stuff – ina226 i2c. In simple words, it's a voltage sensor to read voltage and current over i2c and show the voltage on the robot's dashboard. You can never have too much telemetry.

Preview
...
#90

Also continued with the barrel jack for powering the Jetson. Got the wrong diameter šŸ¤¦ā€ā™‚ļø

Preview
...
#89

Short dupont wires and colorful pins also arrived. Can't wait to start assembling version 0.0.2

Preview
...
#88

Every time I order from AliExpress I get something wrong. It's already getting funny. I wanted to lay out the gpio pins a bit better and ordered a 40-pin header. But instead I got a header with two rows of 40 instead of 40 total. Oh well, til.

Preview
...
#87

And this is the crazy roboclaw 2x30 motor controller which supports up to 30 amps and can work with encoders via uart or usb. I guess I could’ve used something simpler but it sure looks impressive and cool.

Preview
...
#86

Silicone standoffs turned out to be incredibly handy for mounting boards on the robot.

Preview
...
#85

Just an indispensable thing when prototyping. I don't even know what I'd do without it.

Preview
...
#84

A few more photos that I forgot to post at the very beginning of the process

Preview
...
#83

By the way, here's a charger with balancing for lipo that I don't need anymore. Maybe someday I'll get into drones or rc cars, then it might come in handy again.

Preview
...
#82

After 2 days I figured out the webrtc protocol I'm going to use for streaming video from the robot's camera and controlling the robot from the browser. Of course it's not just a simple http server with requests and responses. By this point I'd already run into a ton of edge cases and odd behavior during reconnects and reboots. I started with a smart signaling server but ended up just broadcasting the message through websocket like an idiot.

Result on the screen. The terminal in the bottom left is a python script sending the offer, the browser on the left is the robot UI with a dualsense connected. After the connection is set up commands from the joystick go through webrtc into the python script through the data channel and for now they're just logged there.

Click to Play
Preview
...
#81

I spent a really long time trying to get these rpi csi cameras working with Ubuntu but nothing worked. Decided to try the official Linux for rpi and everything worked on the first try. Looks like I'll be struggling with it for a while until I save up for a zed 2i. Plus Jetson has a slightly different connector for csi so I'll have to order an adapter.

Click to Play
Preview
...
#80

GPD WIN4 looks like the perfect controller for a robot. The price is of course insane but a full-fledged computer with a keyboard is pretty appealing.

Preview
...
#79

Here's Jetson in recovery mode during reflashing by the way. To enter this mode you need to short 2 contacts.

Preview
...
#78

It's pretty heavy and tall so I'll have to carry it up to the third floor. To mount the PCB I bought some acrylic glass and used a jigsaw to cut out the same shape as the metal plates so I can drill holes anywhere I want.

Preview Preview
...
#77

I also got a V plate for it so I could securely mount it on the robot.

Preview Preview Preview
...
#76

About power supply. At first, I was thinking of using an rc lipo at 7000mah but decided to drop that idea. It bothers me a bit that these batteries can be (even if unlikely) pretty dangerous. You need to keep an eye on them while charging and they don't have a built-in BMS. But they can deliver way more discharge current (though I probably won't need > 10A) and they're much lighter than a stack of 18650s. I spent a long time choosing and eventually stumbled upon V mount batteries which are used in professional video production. These are already assembled 18650 packs with a built-in BMS. They can output 14.45V at 14A which seems more than enough and they have quite a decent capacity.

Preview
...
#75

In the end I saw that cherished screen. So now the system boots from nvme and it seems everything works. Now I need to move everything I have to the new platform and connect and solder all the wires.

Preview
...
#74

I was only able to flash it on the third try, and each time it took about 30 minutes. Every time something new would break. Turned out the problems were because of wireguard, ufw or sometimes ssh would drop.

Preview
...
#73

In the end I went back to the option with nvidia sdk manager

Preview
...
#72

I used my cube with Ubuntu for this. Since the cube has only one slot for nvme m.2 I had to boot the system from a flash drive using try ubuntu. After that I fixed the loader and bios configs. But the system refused to boot. Spent about 2 hours with ChatGPT but still couldn't fix it.

Preview
...
#71

Spent 2 days trying to install L4T on the Jetson. Turned out to be way harder than I thought. At first I naively thought I could just write the SD card image to an NVMe and tweak the BIOS to boot from it but that didn't work.

Preview Preview
...
#70

It’ll be called NVIDIA Jetson Orin Nano super dev kit. Not really because I’ve hit the rpi4 ceiling yet but more to get a sense of the size and future placement of the PCBs on the robot.

Preview
...
#69

Wrote down and sketched a rough diagram and plan of what I'm doing so I don't get lost in all this

Preview
...
...
#67

To get a rough idea of the component layout I needed to figure out the battery first. For now I've settled on a few models and will probably look at the Gens Ace Redline 4S, 5000mAh with a bullet connector. I don’t actually need such a big discharge current but it’s hard to find something smaller with similar capacity. Gens Ace Redline 4S

...
#66

The battery discharge curve isn't exactly linear but you can still roughly estimate the remaining charge in percent. This screen will be on the robot so you can get an idea without looking at the UI. To show telemetry on the dashboard I'll need to add a voltage divider and an ADC. It'll send data via I2C to the rpi where there will be some simple math to calculate the percentage by voltage and send the data to a ros2 topic. From there dashboards or control plane can read it.

Preview
...
#65

You can set the UP/DOWN voltage parameters on the relay. The relay turns on if the voltage is more than 11.4V and turns off if the voltage goes below 10.5V. It's a kind of hysteresis so it doesn't keep switching when crossing the threshold.

Click to Play
Preview
...
#64

Back to the electronics. I put together a rough version of how I want to wire things up. The idea is to use a relay to switch the circuit on and off only within certain limits to prevent over-discharging the battery. And as a bonus, I want to be able to turn each component on separately to make testing and prototyping easier.

Preview
...
#63

Another random thought — you can make the car drift using this. Never thought about it before but when you do it with your own hands you start realizing things that used to seem basic.

...
#62

Looks like I'm starting to drift off and get distracted by things like this. It's not a bad thing but I probably need to finish the basic kinematics first and only then work on these fine details.

...
#61

While I was looking for parts I thought, why do I need two motors in the back and why not just leave one and put in an axle or a differential. But then the idea came to slightly adjust the wheel speeds depending on how the steering turns. Basically the same as a differential but electronic. For example, when turning right, slow down the right motor a bit. It's trivial to implement, just need to choose a good function since it doesn't seem linear.

...
#60

It would be great of course to redo the whole steering wheel and get rid of plastic completely

...
#59

There’s no problem with the links either and they cost next to nothing

Preview
...
#58

I need to check the size and shape but finding an aluminum or copper cam doesn't seem to be a problem.

Preview
...
#57

It’s a bit annoying that the steering knuckle and steering linkage are plastic and flimsy. Especially the little arm in the steering linkage. I think I’ve already stripped its threads while taking apart the steering mechanism a few times when I was tuning and changing the servo. Decided to check what’s on AliExpress and discovered a whole new world.

...
#56

Oh yeah, before I forget I need to go to Bunnings and buy some kind of metal box for storing the lipo and line it with some fireproof material. Just to calm down my inner paranoid.

...
#55

I'm thinking of buying a few acrylic sheets and cutting them to fit neatly with this plate so it's tidier and making a multilayer waffle and mounting components on both sides.

Preview
...
#54

I cleared out the front part so I can install the arm there later and as you can see it's getting tight. I'll have to go to Bunnings on the weekend and buy some acrylic sheets to replace these prototype boards. The idea with the proto boards turned out useless because I never solder anything on them anyway.

Preview
...
#53

Finally got 3 things from Aliexpress that I wanted to solder before switching the robot to lipo 4s

On the left is a discharge controller with a screen where you can show voltage and charge percentage and an estimated time if you set the battery parameters. When it hits the lower threshold the relay cuts off the circuit so you don’t over-discharge the battery. Not super useful for lipo though.

At the bottom is just an array of switches so you can power all nodes separately and turn some off if needed. There are already 4 now and soon there will be at least 8.

And on the right is an ADC so I can plug it into the circuit, read the voltage on the rpi and send it to a ros2 topic. So I can nicely show the battery level in the UI.

Preview
...
#52

As you can see, the steering wheel responsiveness increased a lot. Also, the bldc is much quieter.

Preview
Click to Play
Preview
...
...
...
#49

Shopping list:

  • pan tilt servo kit
  • xArm ESP32 Bus Servo Robotic Arm
...
#48

I still have a lot of free pins on the PCA9685 anyway.

...
#47

The idea is to put it on 2 servos so you can control the view with a joystick stick. This is called a pan tilt servo kit.

...
#46

I found a CSI camera for rpi lying around that I bought for some project but never used. Tried to connect it and write a simple webrtc server to stream the feed to a browser on the device with the joystick. After 3 hours all I got so far is a green screen.

...
#45

Dualsense is a great gamepad but it doesn't have a screen which isn't very convenient. Looks like a decent candidate — Anbernic running Linux and launching a UI in the browser rg552

...
#44

Next week I'll try to move the project to ros2 but without their build system and project structure. I'll try to use docker and ros2 as a library.

...
#43

The idea that the joystick sends events into the pipe and other nodes just subscribe to topics and react is beautiful.

...
#42

I'm slowly starting to realize why ros2 looks a lot like microservices with pipes. In my script it's not very convenient that components depend on each other a lot and know everything about everyone.

...
#41

There's also docker compose watch mode but I haven't figured it out yet, maybe I'll get back to it later

...
#40

Moved the whole project to docker compose and uv, so now it's easier to manage dependencies and you can conveniently proxy devices with mapping:

services:
  rabbit:
    build: .
    volumes:
      - ./src:/app/src
    devices:
      - '/dev/input/event0:/dev/joy'
      - '/dev/ttyAMA0:/dev/roboclaw'
    privileged: true
    command: uv run /app/src/main.py
    stdin_open: true
    tty: true
...
#39

I need to mount the PCBs using vertical/horizontal mounts on an acrylic or some other plate that I can easily drill holes in and attach other components to. This way the robot chassis won't get drilled or damaged if I need to redo something.

...
#38

In theory, you can swap out the motors and put in bldc but you'll have to change the controller.

...
#37

First ride. The steering is a bit off balance, the turn angle is too small, I should increase it and adjust the pwm pulses. The motors are kind of slow, I need to either get bigger wheels or use different gearboxes. But overall I'm really happy that it moved.

Click to Play
Preview
...
#36

I already tested the servos before but now I connected them properly to the controller and tweaked the Python script.

Click to Play
Preview
...
#35

For powering the LM2596 step down dc dc to 6V

Preview
...
#34

I'll control the servo with PWM, i2c and PCA9685

...
#33

The 1501MG servo I have is pretty cheap and noisy. I'll replace it when the new one arrives but for now this is what I've got.

...
#32

Oh yeah, at first I started writing code right on the rpi through ssh but a lot of things didn’t work well in vscode so I decided to develop locally on my mac and sync files using mutagen. Pretty simple and cool tool. One more tool in the toolbox.

...
#31

Now it's time to deal with the servo and make it work with the sticks.

...
#30

I added a 1-second timeout setting in roboclaw in 1C so the motors stop if the controller doesn't get commands for 1 second. This is needed to avoid sticking if the program suddenly crashes or if there's some kind of bug.

...
#29

In the end I just got a Python script with 3 classes (rabbit, joy and roboclaw) and 2 threads with loops (one listens to the joystick and updates the state, the other sends commands in an endless loop to roboclaw over UART)

...
#28

When I connected everything the robot went backwards instead of forwards but you can fix it by just multiplying by -1 or swapping the wires.

...
#27

Connecting the controller turned out to be easy and everything worked the first time. I’m thinking of making the R2 trigger control forward movement. The value range from 0 to 255 can be normalized to roboclaw’s range (-32767, 32767) with a simple formula.

...
#26

For now, I decided not to bother with bluetooth for controlling it through the PS5 dualsense, especially since the final goal is control over the internet, not bluetooth.

...
#25

It's actually interesting to remember everything I went through at school, university and heard from my dad and use it in the real world.

...
#24

Resistors for the 5V -> 3.3V divider. Had to remember Ohm's law šŸ¤”

Preview Preview
...
#23

The first launch didn't go so well because one wire was soldered badly and I spent a long time looking for the problem but after checking with a multimeter I found the issue and everything started working.

Click to Play
Preview
...
#22

At first I thought about powering the rpi directly from gpio 2 or 4 but decided not to do it so I don't fry it by accident. In the end I took a step-down regulator polou 5V D24V90F5 and soldered a usbc cable to connect them. Maybe this could also be done a bit neater.

Preview
...
#21

Before that I also soldered a voltage divider to connect the RX of the rpi and roboclaw because they work at different levels: 3V and 5V. But I've already swapped it for a step-down converter.

Preview
...
#20

I added an LM2596 for the servo and set it to 6V like my dad suggested. I need to order a few more of these but with a screen so it's easier to monitor the voltage without a multimeter.

Click to Play
Preview
...
#19

Soldered a common GND for all elements using dupont pins

Preview Preview
...
#18

Had to make the holes for M3 a bit bigger

Preview
...
#17

I took apart the rpi, removed the heating sink, but stuck on some heat sinks

Preview
...
#16

Going back to the board. I got really lucky ordering nylon standoffs from Amazon. First, I fixed the steering mechanism by making the arms a bit longer. Second, these standoffs make it super easy to place all the PCBs on the prototyping board.

Preview Preview Preview
...
#15

I'll talk about this a bit later, but turns out I forgot to increase the current limit on the power supply when I tested the robot for the first time. So, when testing the joystick, if I suddenly pressed the trigger, the current jumped and the rpi would shut down. After sitting down with the logs for a while, I found this:

May 25 01:36:39 rabbit kernel: hwmon hwmon2: Undervoltage detected!
May 25 01:36:41 rabbit kernel: hwmon hwmon2: Voltage normalised

which shows there's a problem. I'll try to raise the max to 3 - 4 A and see how it goes.

Click to Play
Preview
...
#14

Today was actually pretty good progress. I bought 3 prototype boards and connected them together.

Preview
...
#13

For now I'm thinking to stick with the prototype board and put everything together on it. At least the layout will be clear and it'll be a bit easier to spread everything out later.

...
#12

Started thinking about a custom PCB and dusting off the laser iron. Spent some time with KiCad and realized it's too early - there are still too many things I don't understand. I'll put it off until MCP comes out for PCB-CAD or I finally figure things out. Maybe one day Claude will learn to design boards.

...
...
#10

For now everything is of course held together with wires and mounted on a breadboard – I probably need to solder all this onto a proper PCB with real traces instead of wires. But first I need to make it actually move. One step at a time!

...
#9

In the end I'll order a TXS0108E or just quickly throw together a voltage divider on resistors but I need to go to Jaycar for resistors.

...
#8

The problem was that I stupidly bought a TXB0104, thinking that this level shifter would work with UART and let me connect RX on the RoboClaw (which runs at 5V), but it didn't work. I disconnected it and just left TX 3.3V from the Raspberry Pi.

...
...
#6

RoboClaw doesn't stop if your script crashes - that's dangerous! You definitely need to enable RC timeout and send commands in a loop.

...
#5

I found out there are 2 ways to work with DualSense from the browser: Gamepad API (standard but limited) and WebHID API (full access to all features).

...
#4

Turns out Raspberry Pi has just one PWM output, which is OK for tests but I still ordered the 16-channel PWM driver PCA9685 just in case I decide to add another servo. Better to overdo it than hack together some ugly workaround later.

...
#3

I was planning to run the steering servo today and try to turn it with the Raspberry Pi, but Amazon didn't deliver the solder so I'll have to wait to do any soldering.

...
#2

Ordered some basic components and tools for assembly from AliExpress and Amazon.

Preview
...
#1

Decided to dust off my soldering skills a bit and mix that with what I’ve learned working as a full-stack dev. I want to build a robot that can be controlled over the internet and uses Ackermann steering. The second step is to dive deeper into ROS2 and autonomous navigation.